
从上篇文章可以知道,react-router 本质上,利用了 history api 的 pushState, replaceState 方法来控制路由地址,然后使用 popstate, hashchange 事件来监听变化,从而做出相应的视图变化。这篇文章要讲的,就是视图变化的逻辑这部分。
推荐:★★★★
索引
引子
- 如上所说,其实在
history与react-router之间,核心就差了视图如何变化的逻辑部分。 - 在了解到内部原理之前,我理解的流程图是这样的。
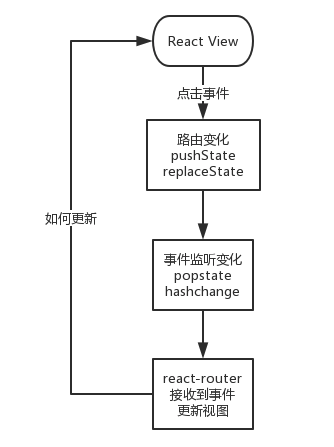
- 接下来我们来慢慢找出这剩余的部分。然后来看看和最初的印象有什么不同。
- 注意:这里的所有代码均基于
react-router的 v4+ 版本。
组件
我最初的想法是查看调用栈来观察路由和视图的变化关系。于是写了一个组件,点击事件调用
pushState/replaceState方法来手动更新浏览器地址,但是却发现,不会有什么变化。其实这符合预期,这个方法本身就只会更新地址,而不会更新页面,不会让页面重新加载。因此,让我们还是从组件入手。
从这里可以看到有许多组件。我们着重分析其中的
Link、Router、Route、Switch. 剩余的也就顺理成章去理解了。
Link
Link是react-router-dom提供的一个组件。用来实现路由间的切换。至于react-router-dom和react-router的关系后文会说。那为什么
Link就可以轻松做到跳转呢。让我们一步步来看Link里都有什么。打印出
Link,简化后,主要是以下的部分。1
2
3
4
5
6
7
8
9
10
11
12
13
14
15
16
17
18
19
20
21
22
23
24
25
26
27
28
29
30
31
32
33
34
35
36
37
38
39
40
41
42
43
44
45
46
47
48
49
50
51
52/**
* The public API for rendering a history-aware <a>.
*/
class Link extends React.Component {
static defaultProps = {
replace: false
}
// 参数都是必传的
static contextTypes = {
router: PropTypes.shape({
history: PropTypes.shape({
push: PropTypes.func.isRequired,
replace: PropTypes.func.isRequired,
createHref: PropTypes.func.isRequired
}).isRequired
}).isRequired
}
handleClick = (event) => {
if (this.props.onClick)
this.props.onClick(event)
if (
!event.defaultPrevented && // onClick prevented default
event.button === 0 && // ignore right clicks
!this.props.target && // let browser handle "target=_blank" etc.
!isModifiedEvent(event) // ignore clicks with modifier keys
) {
event.preventDefault()
const { history } = this.context.router
const { replace, to } = this.props
if (replace) {
history.replace(to)
} else {
history.push(to)
}
}
}
render() {
const { replace, to, innerRef, ...props } = this.props // eslint-disable-line no-unused-vars
const href = this.context.router.history.createHref(
typeof to === 'string' ? { pathname: to } : to
)
return <a {...props} onClick={this.handleClick} href={href} ref={innerRef}/>
}
}可以很明确的看到,
Link标签本质上返回的是a标签。只是对onClick方法做了处理。而在
click方法里,最主要的处理就是禁用默认事件,也就是阻止a标签默认的跳转href的行为。避免直接跳转页面。然后使用history的push(pushState) 和replace(replaceState) 方法进行跳转。push方法里除了核心的pushState逻辑,还有另一个核心操作setState. 详情可见 在它的逻辑里,它调用了之前注册的方法。后文会提到。这里的
history就是上篇文章分析的history,只不过在react-router库里,它被当成props的部分,由最上层往下传递。至于为何这样做,是可以更好的管理history, 和在组件里进行diff比对从而去做其他处理。上篇文末有说明。然后观察传入给
a的参数to. 它接受String或者Object. 通常我们会以String的形式传入。但最终它会被包装成类似{ pathname: to }这样的格式。其实这个组件本质上做的事情,和我们在引子里理解的内容类似。基于
history的操作,那么接收方是如何去根据变化而渲染组件的呢。来看看其他的重要组件。
Router
Router是react-router里最常用的组件之一,它接收history和children两个参数。这个组件属于较底层的组件,实际应用的时候可能会使用基于它扩展后的组件,来应对不同场景下的需求。例如在官方文档里,列举了以下几个具体的组件。
<BrowserRouter><HashRouter><MemoryRouter><NativeRouter><StaticRouter>BrowserRouter是在现代浏览器里使用较多的组件,它在支持HTML5的history API的地方使用。通过独立的包react-router-dom提供。其余组件做的事情类似,只是使用方式略有不同,这里不再赘述。- 这里是具体的文档
通常情况下,
Router作为父组件,包裹着Route和Switch等组件。观察它的源码。它本质上也是
React组件。在渲染的时候,注册监听了事件。下文细说。1
2
3
4
5
6
7
8
9
10
11
12
13
14
15
16
17
18
19
20
21
22
23
24
25
26
27
28
29
30
31
32
33
34
35
36
37
38
39
40
41
42
43
44
45
46
47
48
49
50
51
52
53
54
55
56
57
58
59
60
61
62
63
64
65
66/**
* The public API for putting history on context.
*/
class Router extends React.Component {
static propTypes = {
history: PropTypes.object.isRequired,
children: PropTypes.node
}
static contextTypes = {
router: PropTypes.object
}
static childContextTypes = {
router: PropTypes.object.isRequired
}
getChildContext() {
return {
router: {
...this.context.router,
history: this.props.history,
route: {
location: this.props.history.location,
match: this.state.match
}
}
}
}
state = {
match: this.computeMatch(this.props.history.location.pathname)
}
computeMatch(pathname) {
return {
path: '/',
url: '/',
params: {},
isExact: pathname === '/'
}
}
componentWillMount() {
const { children, history } = this.props
// Do this here so we can setState when a <Redirect> changes the
// location in componentWillMount. This happens e.g. when doing
// server rendering using a <StaticRouter>.
this.unlisten = history.listen(() => {
this.setState({
match: this.computeMatch(history.location.pathname)
})
})
}
componentWillUnmount() {
this.unlisten()
}
render() {
const { children } = this.props
return children ? React.Children.only(children) : null
}
}
export default Router在静态
props里可以看到,history是必须的。印证了我们的常规用法。生成history后再作为上下文传入组件内,向下传递给子组件。<Router history={history}>然后在生命周期
componentWillMount里,使用history.listen注册了setState事件。当路由变化时,会自动触发history内的setState事件,进而触发当前传入的更新state的事件。原理就是上文的Link的内部逻辑,加上之前分析的history的push方法里的逻辑和事件订阅发布逻辑。- 注意这里,使用箭头函数保证
this的指向仍是Router. - 当
Link点击事件触发时,实际上调用的是当前的this.setState({ match: this.computeMatch(history.location.pathname) })方法。 - 此时返回的
match是形如{ path: '/', url: '/', params: {}, isExact: pathname === '/'}的对象。 return { router: { route: { match: this.state.match } } }通过getChildContext方法以上下文context的方式传给子组件route.
- 注意这里,使用箭头函数保证
这就一部分解释了为什么
Link里,点击后的事件,会导致当前Router的state的变化,进而改变context.router里的内容。然后将此传递给子组件Route.然后它返回一个解绑函数。在组件卸载
componentWillUnmount时调用unlisten卸载。到这里,这就是动作变化引起视图变化的核心逻辑了。接下来是,视图如何根据传入的值匹配应当显示的组件。
Route
首先了解下基本的用法。
Route组件是允许传入几种不同类型的值的。component: 直接将组件传入。当路由匹配的时候才会渲染,将props作为参数传入,然后创建元素。<Route path='/' exact component={Main}/>- 创建方式:
React.createElement(props)
render: 返回一个函数,可以直接是包装后的组件,或者直接是元素。直接调用。<Route path='/home' render={() => <Home/>} />- 创建方式:
render(props)
children: 一个函数,和render类似。但它在任何情况下,只要传入值就会渲染。它接收的props和其他方式相同,除了在不匹配的情况下,match的值为null这点不同。它的业务场景,可能是用于一些固定显示在页面的组件,然后通过match的值来控制样式。以下是简化的
Route源码。1
2
3
4
5
6
7
8
9
10
11
12
13
14
15
16
17
18
19
20
21
22
23
24
25
26
27
28
29
30
31
32
33
34
35
36
37
38
39
40
41
42
43
44
45
46
47
48
49
50
51
52
53
54
55
56
57
58
59
60
61
62
63
64
65
66
67
68
69
70
71
72
73
74import matchPath from './matchPath'
/**
* The public API for matching a single path and rendering.
*/
class Route extends React.Component {
static contextTypes = {
router: PropTypes.shape({
history: PropTypes.object.isRequired,
route: PropTypes.object.isRequired,
staticContext: PropTypes.object
})
}
getChildContext() {
return {
router: {
...this.context.router,
route: {
location: this.props.location || this.context.router.route.location,
match: this.state.match
}
}
}
}
state = {
match: this.computeMatch(this.props, this.context.router)
}
computeMatch({ computedMatch, location, path, strict, exact, sensitive }, router) {
if (computedMatch)
return computedMatch // <Switch> already computed the match for us
const { route } = router
const pathname = (location || route.location).pathname
return path ? matchPath(pathname, { path, strict, exact, sensitive }) : route.match
}
componentWillReceiveProps(nextProps, nextContext) {
this.setState({
match: this.computeMatch(nextProps, nextContext.router)
})
}
render() {
const { match } = this.state
const { children, component, render } = this.props
const { history, route, staticContext } = this.context.router
const location = this.props.location || route.location
const props = { match, location, history, staticContext }
return (
component ? ( // component prop gets first priority, only called if there's a match
match ? React.createElement(component, props) : null
) : render ? ( // render prop is next, only called if there's a match
match ? render(props) : null
) : children ? ( // children come last, always called
typeof children === 'function' ? (
children(props)
) : !isEmptyChildren(children) ? (
React.Children.only(children)
) : (
null
)
) : (
null
)
)
}
}
export default Route在
Route组件里,首先我们看到render里,由组件的内容类型来决定渲染是component或render或children. 然后由this.state.match这个字段决定了当前的元素是否渲染。接着在上述源码里,
this.state.match字段是在componentWillReceiveProps和初始化里可以看到。而这个变量,由一个比较重要的函数computeMatch返回。它是用来对比当前路由是否匹配,依此来决定渲染组件或者不渲染。它的具体的值下文会讲到。computeMatch接收nextProps和context.router作为参数。首先判断是否处于Switch组件中,如果在其中,则直接走Switch安排的逻辑,它有着自己的一套计算匹配逻辑。否则,则继续判断。接下来的核心判断,是获取
pathname, 通过props.location||context.router.route.pathname获取。然后将其作为参数,传入另一个重要方法matchPath中,做计算匹配的逻辑。当然,有一些参数作为辅助判断,例如
exact、sensitive、strict等。matchPath是外部引入的,独立的一个文件包装的方法。可以直接看源码。-
1
2
3
4
5
6
7
8
9
10
11
12
13
14
15
16
17
18
19
20
21
22
23
24
25
26
27
28
29
30
31
32
33
34
35
36
37
38
39
40
41
42
43
44
45
46
47
48
49
50
51
52
53
54
55
56
57import pathToRegexp from 'path-to-regexp'
const patternCache = {}
const cacheLimit = 10000
let cacheCount = 0
const compilePath = (pattern, options) => {
const cacheKey = `${options.end}${options.strict}${options.sensitive}`
const cache = patternCache[cacheKey] || (patternCache[cacheKey] = {})
if (cache[pattern])
return cache[pattern]
const keys = []
const re = pathToRegexp(pattern, keys, options)
const compiledPattern = { re, keys }
if (cacheCount < cacheLimit) {
cache[pattern] = compiledPattern
cacheCount++
}
return compiledPattern
}
/**
* Public API for matching a URL pathname to a path pattern.
*/
const matchPath = (pathname, options = {}) => {
if (typeof options === 'string')
options = { path: options }
const { path = '/', exact = false, strict = false, sensitive = false } = options
const { re, keys } = compilePath(path, { end: exact, strict, sensitive })
const match = re.exec(pathname)
if (!match)
return null
const [ url, ...values ] = match
const isExact = pathname === url
if (exact && !isExact)
return null
return {
path, // the path pattern used to match
url: path === '/' && url === '' ? '/' : url, // the matched portion of the URL
isExact, // whether or not we matched exactly
params: keys.reduce((memo, key, index) => {
memo[key.name] = values[index]
return memo
}, {})
}
}
export default matchPath matchPath通过返回一个对象,来确定路由是否匹配。(官方文档有关于这个对象的介绍match)如果匹配,则返回一个包含path,url,isExact,params等属性的对象。否则,则返回null.判断的主要逻辑是通过正则。
引入了外部的独立的库
path-to-regexp来将地址转化成正则。compilePath方法里:const re = pathToRegexp(pattern, keys, options)const { re, keys } = compilePath(path, { end: exact, strict, sensitive })const match = re.exec(pathname)- 这里的返回对象,最终在
Route组件的render中起到了决定性的作用。每一个Route都会根据这个match对象来判断,符合则渲染,不符合则返回null.
compilePath中可以看到,除了上述常规判断以外,加了一层缓存逻辑。cache[pattern]保存了上次的记录,可以直接从缓存中读取。只是属性名比较奇怪,类似truefalsefalse的形式。这里不确定只是幽默还是有意义的设计。
Switch
观察
Switch的源码可以发现,它本质上也是调用了matchPath来判断匹配结果。{ computedMatch: match }作为入参传入,呼应了上文的判断。-
1
2
3
4
5
6
7
8
9
10
11
12
13
14
15
16
17
18
19
20
21
22
23
24
25
26
27
28
29
30
31
32
33
34
35
import matchPath from './matchPath'
/**
* The public API for rendering the first <Route> that matches.
*/
class Switch extends React.Component {
static contextTypes = {
router: PropTypes.shape({
route: PropTypes.object.isRequired
}).isRequired
}
render() {
const { route } = this.context.router
const { children } = this.props
const location = this.props.location || route.location
let match, child
React.Children.forEach(children, element => {
if (!React.isValidElement(element)) return
const { path: pathProp, exact, strict, sensitive, from } = element.props
const path = pathProp || from
if (match == null) {
child = element
match = path ? matchPath(location.pathname, { path, exact, strict, sensitive }) : route.match
}
})
return match ? React.cloneElement(child, { location, computedMatch: match }) : null
}
}
export default Switch
withRouter
withRouter是一个高阶组件。个人理解,它比较像是react-redux的Provider组件。它将原生的组件传入,然后通过Route包装,沿用props当前的组件,返回这个包装后的组件。1
2
3
4
5
6
7
8
9
10
11
12
13
14
15
16
17
18
19
20
21
22
23
24
25import hoistStatics from 'hoist-non-react-statics'
import Route from './Route'
/**
* A public higher-order component to access the imperative API
*/
const withRouter = (Component) => {
const C = (props) => {
const { wrappedComponentRef, ...remainingProps } = props
return (
<Route render={routeComponentProps => (
<Component {...remainingProps} {...routeComponentProps} ref={wrappedComponentRef}/>
)}/>
)
}
C.displayName = `withRouter(${Component.displayName || Component.name})`
C.WrappedComponent = Component
C.propTypes = {
wrappedComponentRef: PropTypes.func
}
return hoistStatics(C, Component)
}
export default withRouter目前在项目中我还没有用到它,等用到的时候,再来补充下具体的使用场景。
react-router与react-router-dom
好了,现在来补充这两个库的不同。
react-router是一个底层的库,任何其他的基于React的路由库都基于它。但是在实际应用中,我们可能要对不同的场景做一些细分,以便更好地使用它们。于是,就有了为现代浏览器提供的
react-router-dom. 观察代码可以发现,它的核心组件,例如Route、Switch、withRouter都是从react-router直接引入的。- 另外,例如
BrowserRouter这个组件则是在内部自己创建了history, 从而略去了手动创建。它本质上仍然是Router, 外加一个自给自足的过程。 history = createHistory(this.props)
- 另外,例如
除此之外,自然还有在
React-Native中使用的react-router-native, 以及结合redux使用的react-router-redux等等。
小结
- 在了解完这么多组件的内容和原理后,相信我们对于
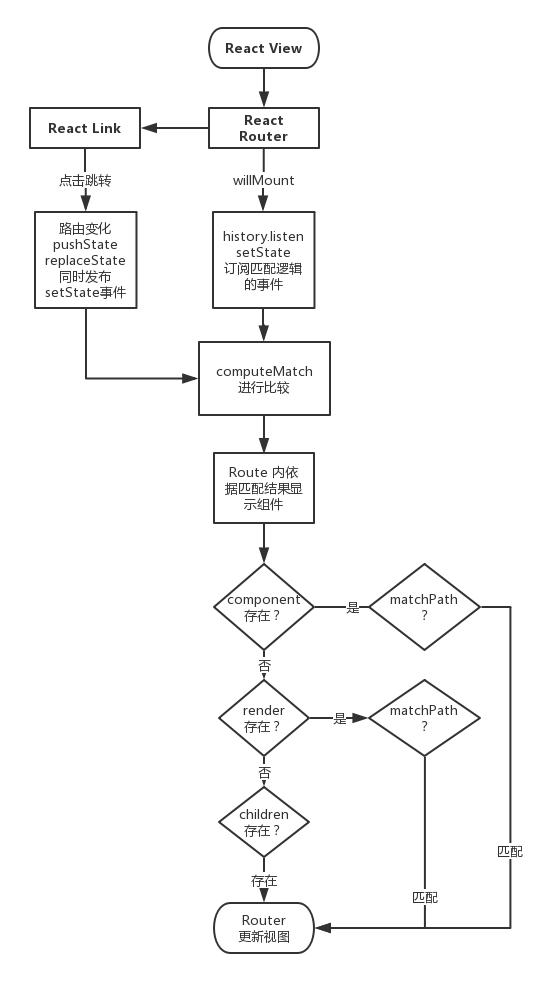
react-router的实现,有了一定的清晰思路了。我们会发现,最终总结的和最初理解的不一样。其实就是自己的理解在一开始是不完善的,甚至有些误解。这个时候,让我们再把流程图再重新梳理,画一遍。下面是简略的更新逻辑过程。
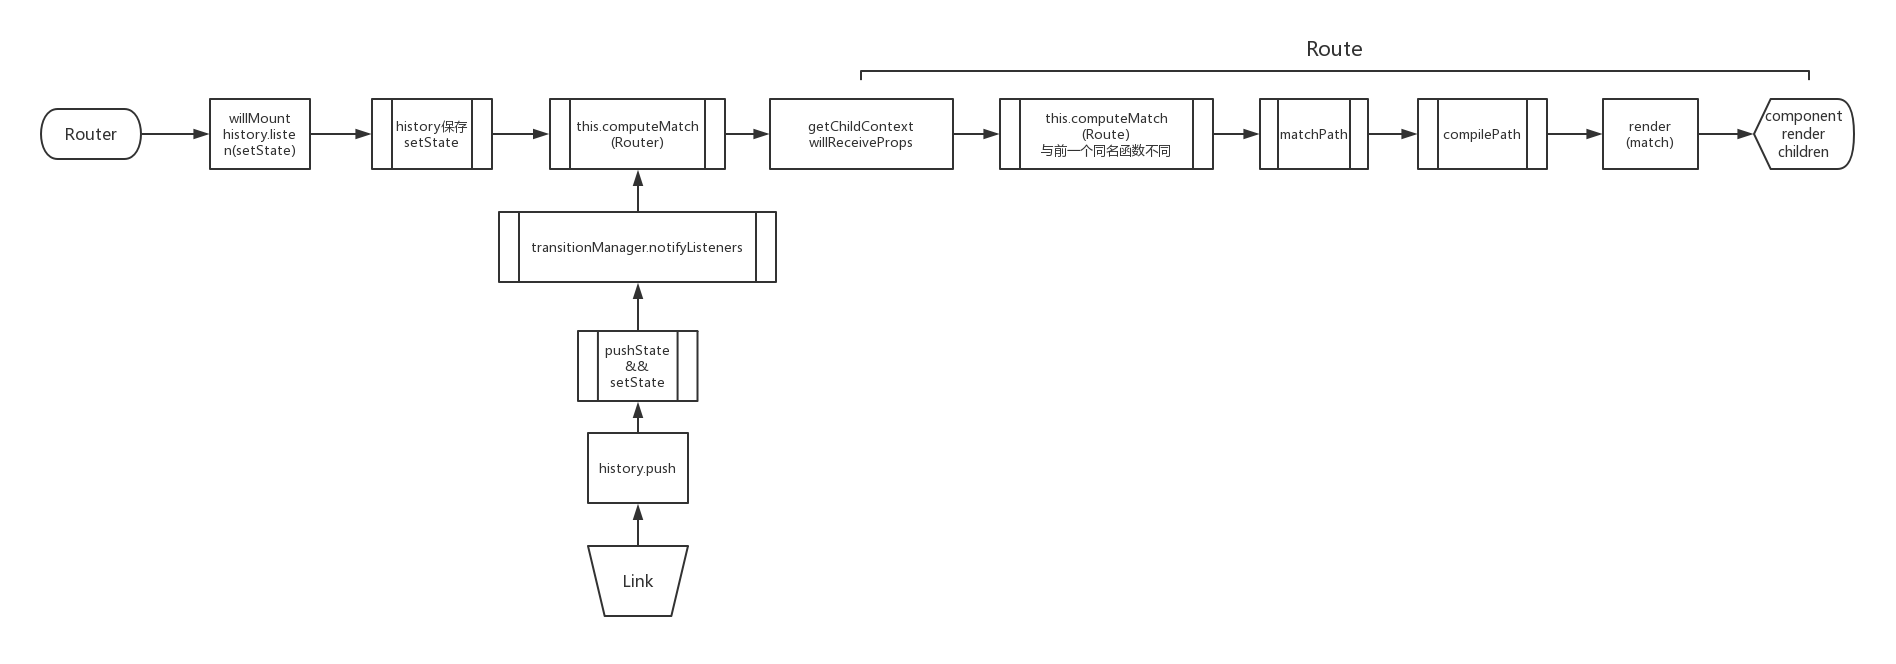
- 下面是一张调用栈的图,或许可以更直观地展示调用了哪些方法以及它们的执行顺序。以
Link的点击事件流程为例。
遗漏的坑
- 到此,主要的逻辑就解释完毕了。
- 以下是遗留的几个待完成的 TODO. 可能会马上补上也可能需要点时间,但最终,我会补上的。
react-router或history在node中的应用。path-to-regexp的原理及为何使用缓存。- 使用缓存来节约内存空间。2019-06 补坑。
-
popstate和hashchange最后到底在哪些地方进行了调用和应用。- 在上篇 history 的文章已有说明。2019-06 补坑。
参考

评论